
Historic Prices on your trading Screen
The one-click trading screen is perhaps the screen most people first recognise, as it’s very similar to what you see on the Betfair website.
In most software, its capability is minimal, as are the customisation options. With Bet Angel, that problem doesn’t exist; you have complete flexibility on what you can do and how you can display information on the screen and interact with it.
The Bet Angel one-click trading screen has the most customizable one-click Betfair trading screens found in any Betfair trading software, and this means you have the freedom to set it up and do almost anything you want with it.
Customising the One-Click screen
One way you can customise your one-click screen is by creating custom columns to display dynamic historical data/information from the market at past intervals of your choice. This information can be imported and shown on your one-click screen using ‘Stored values held in History lists’.
That might not sound very easy, but it’s effortless to set up, and this is what we want to achieve by the end of this blog. By then, you’ll be able to display any type of historical data of your choice, like price, volume, book%, VWAP, etc, etc, from the intervals you want.
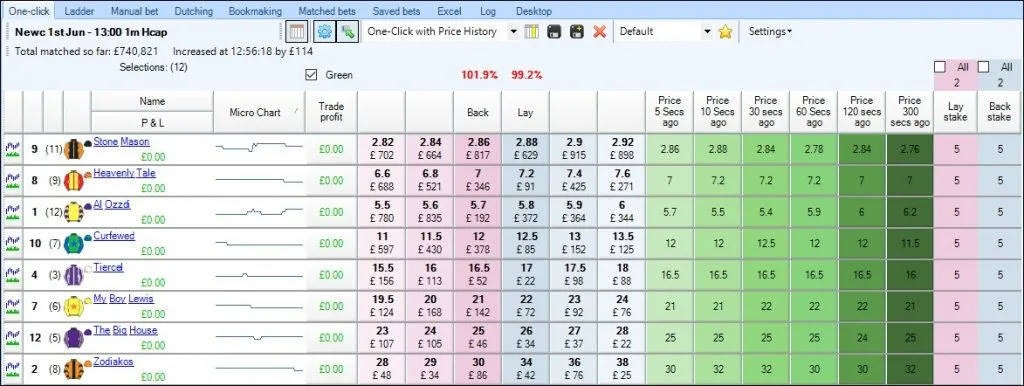
For this example, I’ll create some custom columns to display the dynamic historical ‘back prices’ of each selection at 5, 10, 30, 60, 180, and 300 seconds ago.
You will need to be using the Bet Angel V1.55 or above, which contains the Stored Value History Lists feature required to replicate what I’m about to show. If you’ve not already downloaded the latest version, you can do so from the Bet Angel website.
Displaying stored price data
In the image below, I’ve created six custom columns in different shades of green to display what the historical back price of each selection was at six different past intervals. This now gives a clear overview of which direction each selection’s price is trending or if it’s stuck in a range as the off time approaches.
To do this, you just need the following;
1) A simple rules file to store the value of whatever data you want in a History list
2) A Custom Column to display the stored value held in that history list
Creating the Rules File
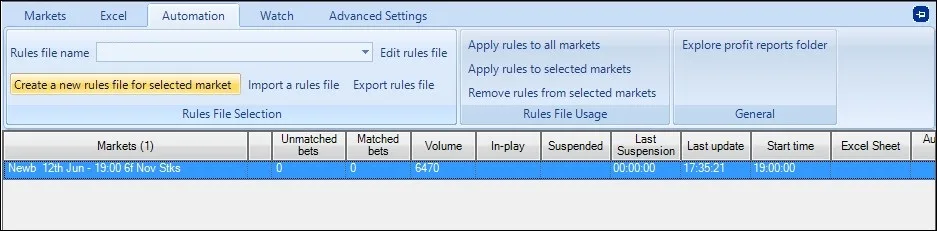
Begin by adding a market (any market) to Guardian, then select it and click ‘Create a New Rules File for Selected Market’.
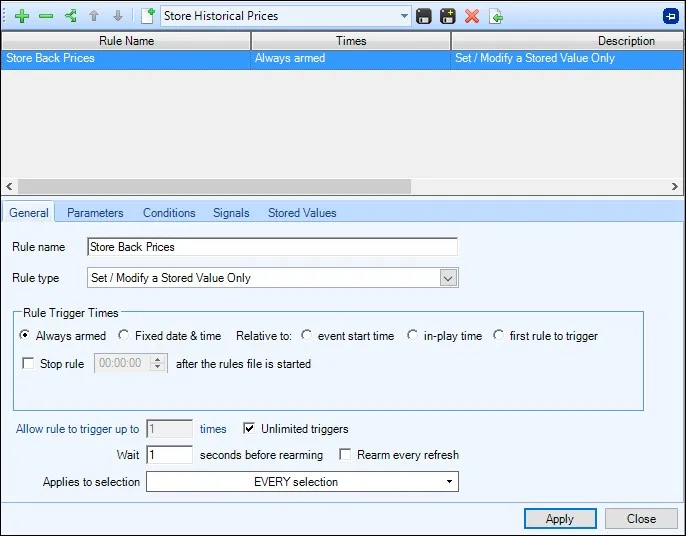
From the list of rule types, you need to select ‘Set/Modify a Stored Value Only’. Below, I’ve applied it to ‘EVERY selection’, setting it always to be armed, able to trigger unlimited times, and re-arm every second.
So basically, as soon as this rules file is applied to a market in Guardian, it will be armed/active and will trigger every second and begin storing whatever value we are about to choose in the next step.
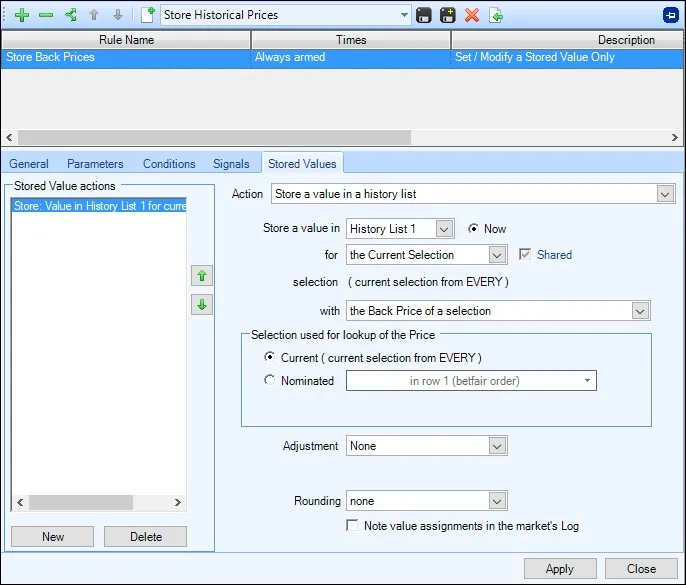
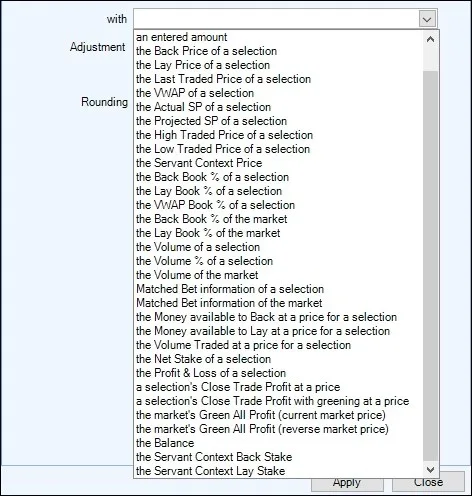
Now we move onto the ‘Stored Values’ tab, here we want to store a value in ‘History list 1’, then below that choose ‘ the current selection’ and then select the information you want to store from the list, in the image below I’ve opted to store ‘the back price of a selection’ – but you can choose anything you want.
As you can see from the list below, there is a huge choice of other information from the market that you could also store (and display on your one-click screen). It’s even possible to store multiple pieces of information, as you have 10 history lists at your disposal.
That means with this one rules file, you could store several types of information into different history lists. You need to configure a custom column on your one-click screen to look at a History List to display the information held in it, so for racing you might want to see the VWAP at 30, 60, 120, 180, 240 and 300 second intervals, for football you might wish to the volume at 1, 5, 10, 30 and 60 minute intervals, the possibilates are endless and once set up and saved you can switch between profiles with a single click.
For now, we’re sticking with storing the back prices of each selection. Once you have selected that (or whatever you’ve chosen to store), save the rules file and give it a name. I’ve named it ‘Store Historical Prices’.
Thats all there is to creating the rules file, all you need to do now is add the markets you are interested in to Guardian each day and apply the rules file to them and do it will begin storing the back price every second, or at whatever intervals you set it to.
Creating Custom Columns
Now we need to return to the One-Click screen and begin creating custom columns to look up and display the values from the rules file we’ve just created. Creating a custom column is just as easy as creating the rules file.
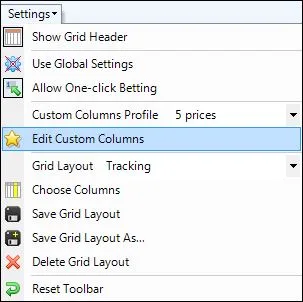
On your One-Click screen, open the ‘Custom Column Editor’ and select ‘Edit Custom Columns’ and choose a custom column to edit.
I’m starting with Custom Column 1, which I have named ‘Price 5 Secs Ago’ (this is the name that appears above the column header on your one-click screen when it’s added). The action we want this custom column to perform is ‘Display a Historical Stored Value’, and below we can select ‘History List 1’ – which is the history list we configured the rules file above to store the back price value in, and we need it to do this for the selection.
Lastly, we just need to choose the historical time we want it to display the value from. For this first custom column, I’m setting this to show the time 5 seconds ago.
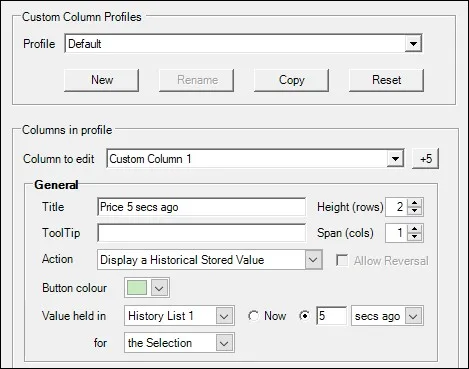
As the rules file triggers in the background, storing the current back price every second in a history list, this custom column examines that history list and displays the value held in it 5 seconds ago.
And thats how easy it is to create a custom column, now click ‘Save’ at the bottom and your done, if you want/need more custom columns you would just repeat the process, the only difference is in the next one I’d set the time to ’10 secs ago’ and so on until I’ve created and saved a total of 6 custom columns to display the historic back price at 5, 10, 30, 60, 180 and 300 secs ago – but you can create as many or as few as you want and use whatever interval and history lists you want.
Remember, your rules file will store the back price in the ‘history list 1’ every second from the moment you apply it to a market in Guardian, and it begins to refresh.
Displaying the Custom Columns
The final part is too select these newly created columns to be displayed on your one-click screen, this is done by opening the ‘column chooser’, (the yellow and white icon that looks like a calendar), from there you can tick all the new columns you want displaying (and remove any current columns you currently have displayed but maybe don’t want at the moment).
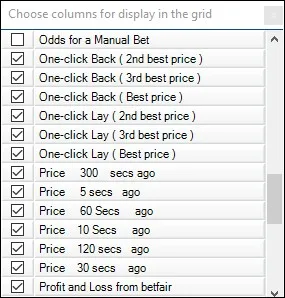
You are now set up. Click the Disc+ icon on your one-click screen, as highlighted in the image below and save your grid layout (which I have named ‘One-Click with Price History’), and you’re ready to go.

As soon as you open any market on your one-click screen, which you have the rules file applied to in Guardian, you’ll see the back price history for the intervals you’ve chosen.
Examples you can download
If you would like to download some ready-made rules files which store various data/information like prices, volume, greening values, etc into History Lists, you can do so from the Bet Angel Forum.
If you do download and import the ‘Price Data’ file from that forum post, it will already store the back price in ‘History List 1’ just as set out above, but if you wanted to display another piece of price data, then you’d change the history list number that the custom column looks at.
For example, after downloading the price data file, when you create a custom column as shown earlier in this blog, if you use a different history list, ie, you choose to look up and display the values held in ‘History List 8’ then that will display what the ‘Lay Book%’ was at your specified intervals.
Remember when creating custom columns and saving grid layouts you can quickly switch back and forth between the saved layouts depending on the type of market you are trading, so you could have a Grid layout showing the historical back prices as in the example above but have another layout displaying historical volume, book%, VWAP or whatever else you might want displaying at at whatever intervals you require.